Simple Crazyflie Example
To install this project, please clone the repository:
git clone https://github.com/aerostack2/project_crazyflie
To start using this project, please go to the root folder of the project.
Setting up
Before launching the project, let’s take a look at the configuration options.
You can find configuation files in the config folder. The are three configuration files used:
config/config.yaml: configuration file for the Crazyflie drones.config/camera_calibration.yaml: configuration file for the AI deck camera calibration.config/pid_speed_controller.yaml: configuration file for the pid controller constants.
By this time, you should only need to modify the config/config.yaml file.
There are two drone configurations available, one for flying with internal position estimation
(e.g. flow deck or lighthouse deck) and another for using an external one (e.g. motion capture system).
Depending on the position estimation method, the configuration file should be set accordingly.
Parameters |
Value |
Description |
|---|---|---|
|
radio://0/80/2M/E7E7E7E7E7 |
Crazyflie URI address (it varies for each drone) |
|
false |
Availability of external odometry |
|
“” |
External odometry topic name (not needed if external_odom is false) |
|
“raw_odometry” |
Plugin name for the state estimator |
Parameters |
Value |
Description |
|---|---|---|
|
radio://0/80/2M/E7E7E7E7E7 |
Crazyflie URI address (it varies for each drone) |
|
true |
Availability of external odometry |
|
“self_localization/pose” |
External odometry topic name (not needed if external_odom is false) |
|
“mocap_pose” |
Plugin name for the state estimator |
|
“/mocap/rigid_bodies” |
Topic where the mocap data is published |
|
“1” |
Name of the rigid body assigned for the drone (it varies for each drone) |
Remember to set the correct addresses in the file for each drone, as indicated in Platform Launch. Leave only the entries for every drone that will be used, even if it is only one.
Note
For propagating the motion capture system data into the ROS 2 system, we recommend using the mocap4ros2 package.
Launching
The execution on the project is split into two parts: Aerostack2 components and ground station.
Launching Aerostack2
To launch every Aerostack2 component, execute the following command:
./launch_as2.bash
This will open a tmux session with an Aerostack2 instance for each drone launched.
Launcher offers a few options to customize the execution. ./launch_as2.bash -h will show option list. Options can be set with the following flags:
-n: select drones namespace to launch, values are comma separated. By default, it launches all drones from world description file.-g: launch using gnome-terminal. By default not set, uses tmux.
Launching Ground Station
To launch the ground station, execute the following command:
./launch_ground_station.bash
Launcher offers a different pool of options to customize the execution. ./launch_ground_station.bash -h will show option list. Options can be set with the following flags:
-m: disable launch mocap4ros2. By default set.-t: launch keyboard teleoperation. By default not set.-v: launch rviz. By default not set.-r: record rosbag. By default not set.-n: select drones namespace to launch, values are comma separated. By default, it launches all drones from world description file.-g: launch using gnome-terminal. By default not set, uses tmux.
Closing
Close all nodes (aerostack2 and ground_station) with the following command:
./stop_tmuxinator.bash
Note
The command tmux kill-server will have a similar effect but closing all tmux sessions, so be careful if you have other tmux sessions running.
If launcher was executed with the flag -g, closing should be done manually exiting all gnome-terminal tabs.
Close only the Aerostack2 nodes with the following command:
./stop_tmuxinator_as2.bash
Close only the ground station nodes with the following command:
./stop_tmuxinator_ground_station.bash
Mission execution
The project offers a few examples of mission execution.
Keyboard Teleoperation control: Using reactive teleoperation control. For both single and multiagent swarms.
Python API missions: Using Aerostack2 python API for mission definition. For single drone, using GPS and multiple drones.
Behavior Tree missions: Using Behavior Tree as the mission planner. For single drone only.
Mission Interpreter: Using Aerostack2 mission interpreter. For single drone only.
Keyboard Teleoperation control
In order to launch the components for a single drone, Aerostack2 launcher does not need any additional flags. Just execute ./launch_as2.bash.
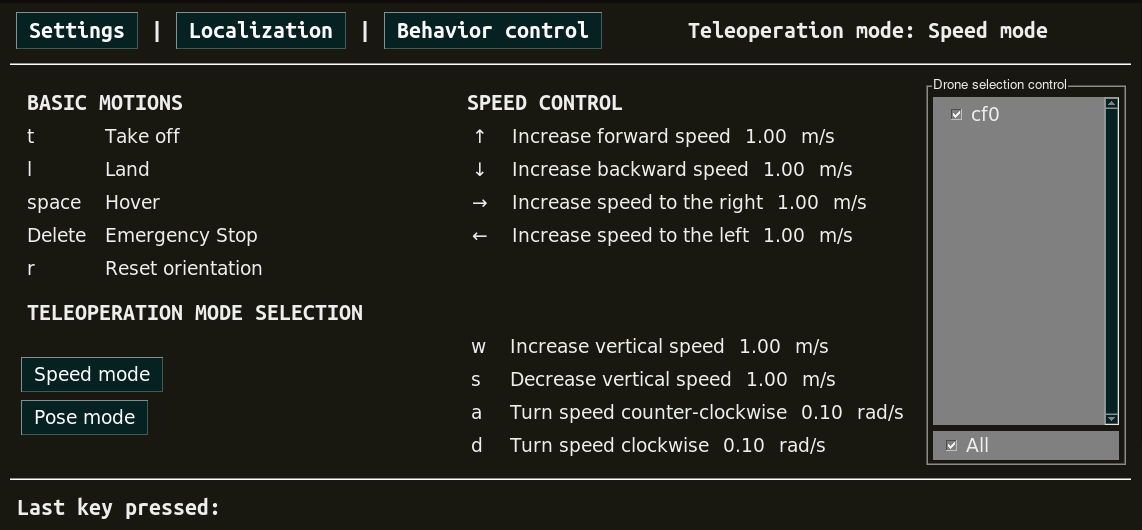
Ground station should be launched with -t flag to enable keyboard teleoperation. Take a look at the keyboard teleoperation user guide for more information.
A window containing the teleoperation widget should pop up:

Keyboard teleoperation
Python API missions
In order to launch the components for multiple drones, both launchers require the flag -n indicating drone namespaces to use.
There are three python scripts available for mission execution in the project. For single drone missions, use python3 mission.py for flying a square.
For multi drone missions, use python3 mission_swarm.py where a group of drones will fly a swarm coreography. Here it is what the execution looks like:
Note
To understand how missions are built using the Aerostack2 python API, take a look at the Python API reference guide.
Mission Interpreter
Previous missions were defined using python syntaxis. Aerostask2 offers a mission interpreter that allows mission definition using a JSON format.
Currently, the mission interpreter script at the project is only available for single drone missions.
To launch the mission interpreter, execute python3 mission_interpreter.py.
The execution is similar to the python API mission where the drone will fly a square.
Behavior Tree
Missions can also be defined using a behavior tree. The project offers a mission example using a behavior tree for a single drone.
To launch the behavior tree mission, execute python3 mission_behavior_tree.py.
The execution is similar to the python API mission where the drone will fly a square.
Note
Trees can be defined using GUIs like Groot.